


Hello and welcome to 2019! If you’ve made any new year’s resolutions that are riding-related, you just might find this post useful. It’s all about improving flexibility in your legs and hips. Having decent flexibility is great for you and your horse, and it’s the kind of exercise that you can do at home, for free, with no equipment – so what’s stopping you?!
In this post we’re mostly working towards doing various types of splits. If your muscles are solid as a rock, don’t be deterred – you don’t have to achieve the splits for both you and your horse to feel the benefit. Anything you can do which helps to loosen up those muscles is time well spent.
Before we get going, here are a few golden rules of stretching:
- Warm your muscles up first – if you like, you can go for a jog. I can’t, so I do something like jumps and squats leaning on something like a wall or table. You just need to get your muscles moving for about 5-10 minutes.
- You must breathe. In particular, you must breathe out. We all tend to be good at breathing in and holding our breath, but breathing out gets forgotten. When you hold your breath, you tense up, and vice versa – so if you’re finding a stretch difficult, breathe out and see if that helps.
- If you want to see an improvement in your flexibility, you do need to be persistent and patient. If you don’t have much time, focus on doing a few stretches really sincerely rather than trying to race through everything.
- Know your limits! My brother would say, ‘you can’t hurry curry’, and basically flexibility = curry. If you injure yourself through over-zealous stretching then all you do is take ten steps back.
- Do what you can. My own stretching routine is heavily dependent on what parts of me have dislocated that day, and which muscles are in spasm. I could just throw in the towel and decide not to bother with any of it, but my body hates rest even more than activity! Instead, I try not to beat myself up over bits that are stiff, nor do I let those bits stop me from working on something else. I have bits of me that are fairly hopeless and will always be – my quads, my left shoulder, my lower back – but hey. I’ll just keep trying.
And one quick disclaimer:
Be sensible. Do what you can. I’m trained to help children stretch effectively, and I am experienced in doing it for myself. I’m not trained to make sure that everyone on the internet does things without injuring themselves. This is NOT an official exercise plan and I take no responsibility for any injuries that you may incur!
Ready to go? Good!
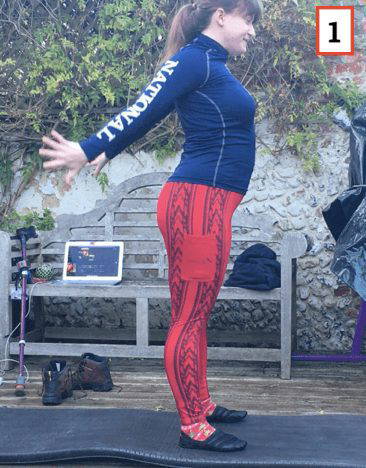
Once you’ve warmed up a bit, it’s wise to mobilise the joints first. I always work my neck, shoulders and arms even if I only really want to stretch my legs, because tension anywhere in the body can transfer to somewhere else – and because it feels nice! Gently and slowly roll your head to stretch your neck, then do some backward arm circles [1]. If you want to test your co-ordination, try circling one arm forwards and the other backwards [2] – then switch directions…

Now you need to mobilise your hips a little [3 and 4]. Imagine you have a pen sticking out of your bum and write your name in massive letters ☺
Leg swings/high kicks [5 and 6]. Don’t worry about how high you can go – just keep your back as straight as possible and swing the leg to loosen it up.
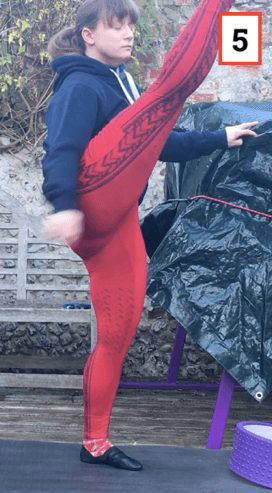
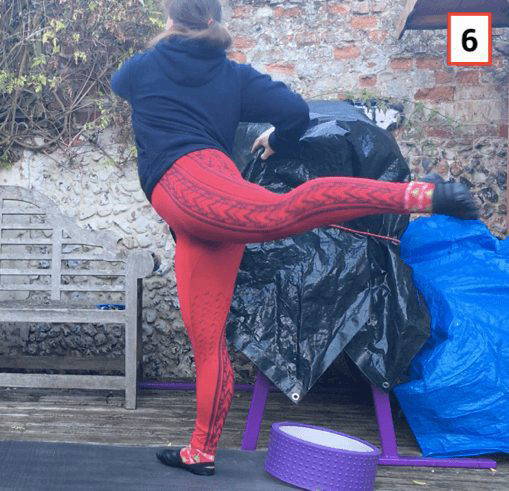
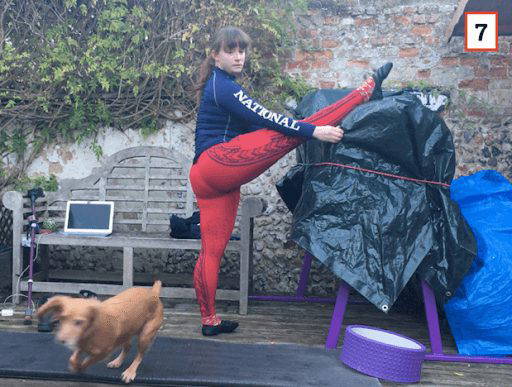
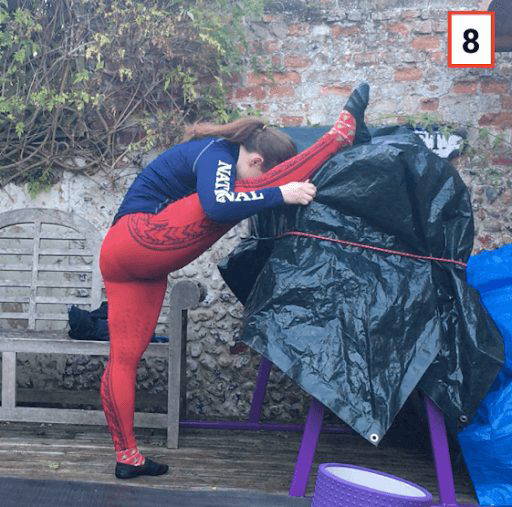
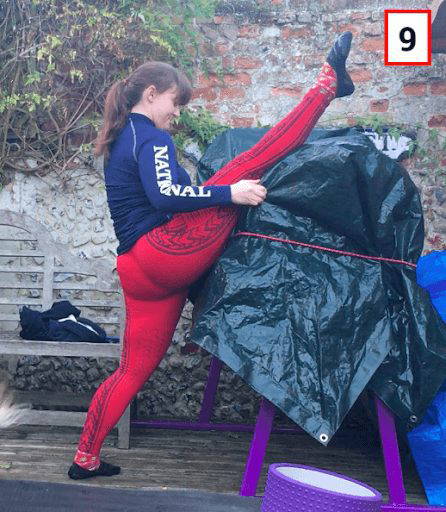
Next, find something reasonably large and solid (fences work well) and pop a leg up [7]! It’s important that both legs are straight so don’t go too high if you can’t do it with straight legs. If it’s too easy, you can intensify it, as in [8 and 9].
 basic stretch
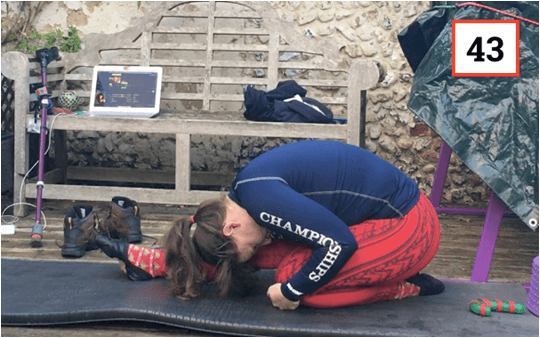
 head down to knee
 press hips forwards (straighter line toe to toe)
The next set of exercises help to get a bit of mobility in your lower back. Don’t worry about how much it moves – as with ALL the stretches here, just go as far as it takes until you can feel a slight pull on the muscle. Remember to breathe!
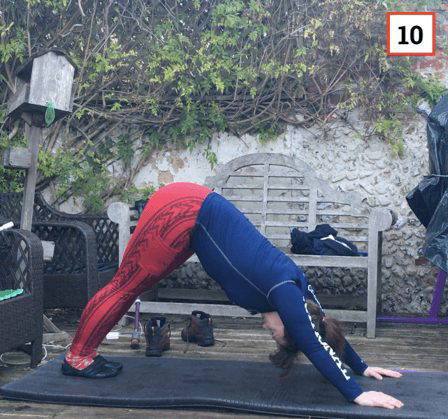
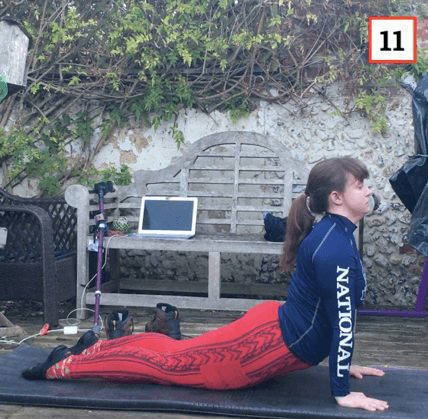
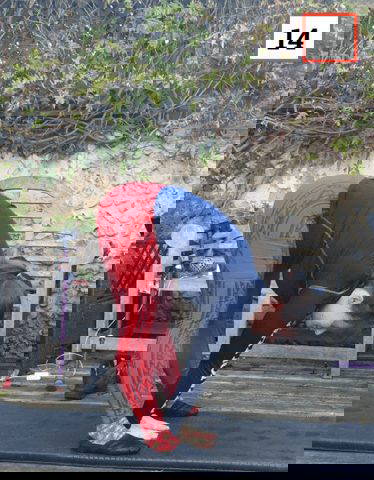
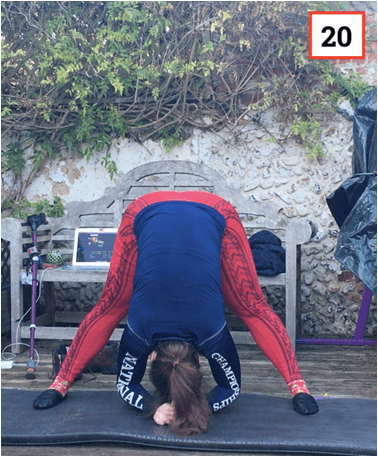
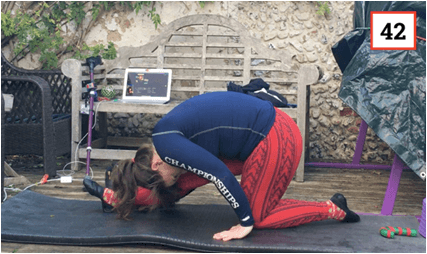
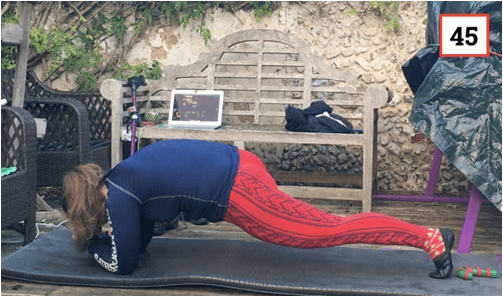
Yoga fans will recognise [10] as the downward dog (it’s not perfect – I’m terrible at yoga). [11] is often called the seal – barking is optional and clapping flippers is not advised.
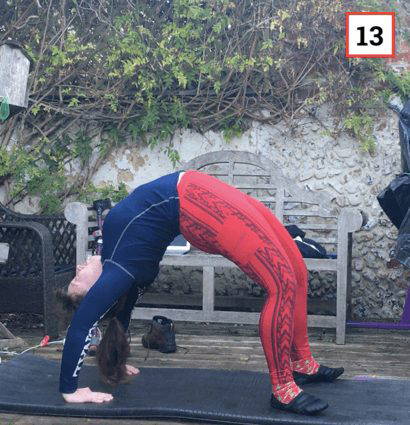
[12] and [13] are both types of bridge. [12] is easier and more comfortable, especially if you have limited shoulder flexibility. Many men find [13] impossible!
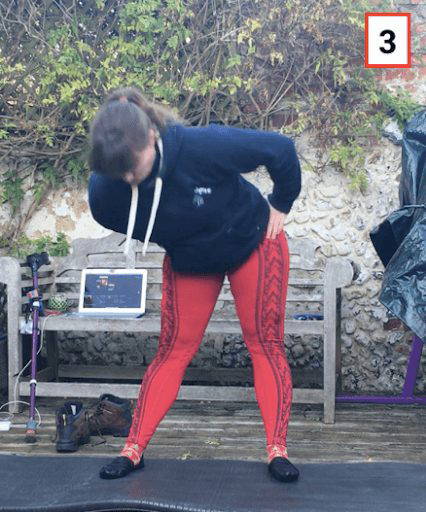
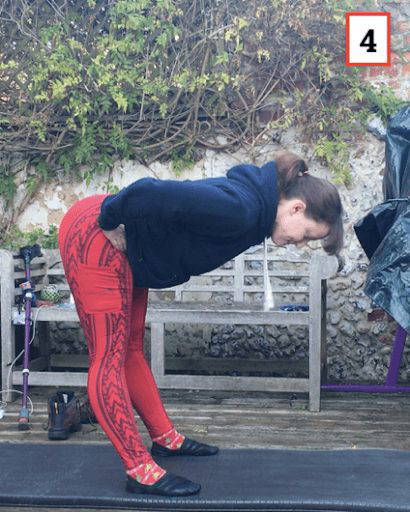
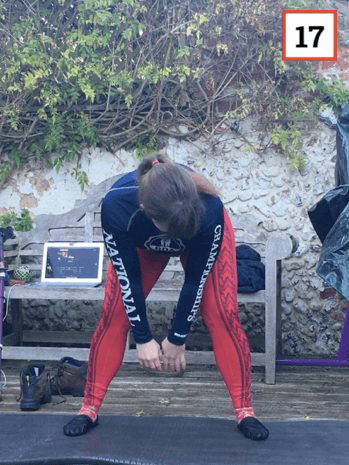
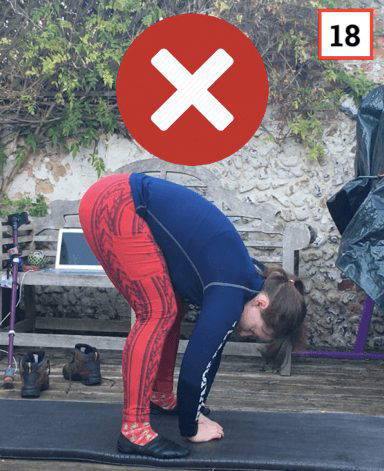
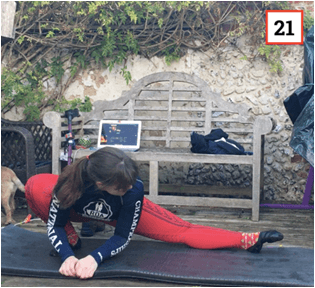
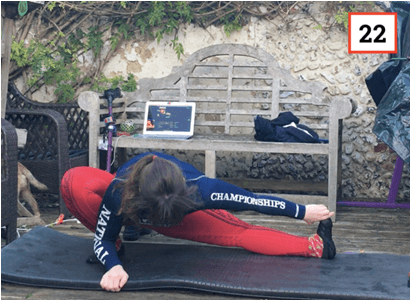
Now we’re going to start stretching the hamstrings a bit more. Pictures [14], [15], [16] and [17] give you different views of this. You stand with your legs a little further than hip-width apart and, keeping them straight (knees locked out) you bend down at the hips/waist towards the ground. The further you go, the better your stretch – but only if you keep those legs straight. You might only be able to reach as far as [17] to begin with, but with practice, you will get lower. [16] is a bit of a variation – by putting your hands further in front of your feet, it’s a bit easier. [15] is, therefore, harder (hands behind feet). [18] shows you how NOT to do it (legs bent)!

Now go to each foot individually [19]. Again, it’s important to keep both legs straight, especially the one which you’re stretching down (so, if you’re going to your right foot, you must keep your right leg straight). Obviously, make sure to do both legs!
To get an even deeper stretch, try to touch your elbows to the ground [20] whilst keeping your legs straight. This is also a good stretch for making you breathe properly – it’s really hard to do this with a chest full of air getting in the way, so you have to breathe out as you go into the stretch.
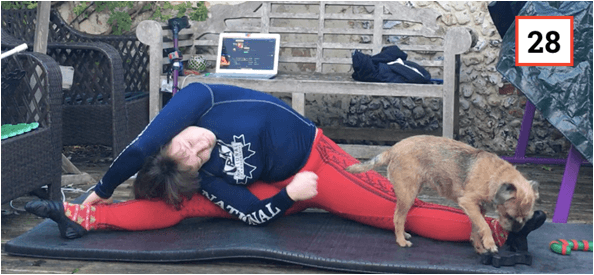
Our first set of splits will be the box splits, also sometimes known as the Chinese or side splits. [21] shows a low sideways lunge with the toe pointed down, and in [22] the foot is flexed and the toes are pulled towards the body. Remember to keep the straight leg fully straight. The further you can sit towards the ground (without falling over!) the deeper the stretch will be. Make sure you do this on both legs. You should feel the stretch in your groin for [21] and more into the back of your legs for [22].
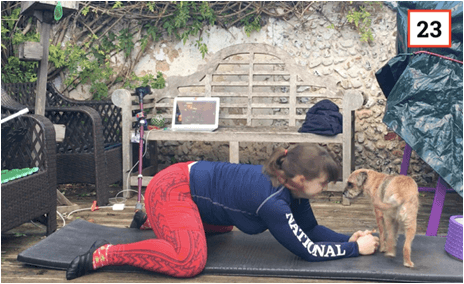

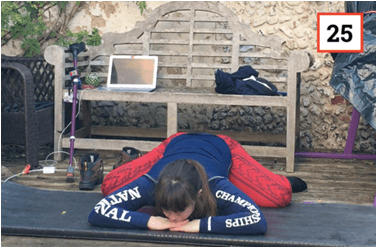
Next we’re going to do ‘the frog’. For this one, you need to kneel on the ground with your elbows down too and feet facing out [23]. To feel more of a stretch, lower your bottom to the ground and also try to put it back (so push your bum towards your feet – [24] and [25]). The more frog-like and compact you can be the more you will feel the stretch. This one is felt over the tops of the hips.
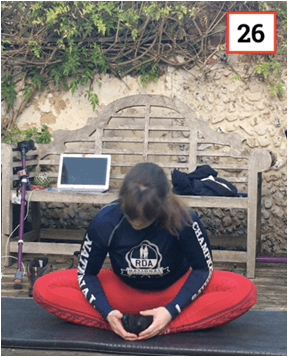
 Next we’re going to stretch the inner thigh a bit more by doing the ‘butterfly seat’ [26]. Sit on the floor and put the soles of your feet together. Bring your heels in close to your body and try to push your knees down to the floor. To get a more intense stretch [27], you can bend over to trap your nose between your toes!
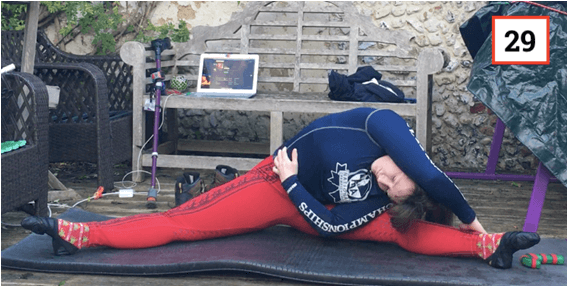
For the next stretch we’re going to sit in straddle, which just means having your legs out in front of you but apart. Try to make the straddle as wide as possible but keep it comfortable – it’s a starting position, not a stretch in itself. Reach towards each foot in turn [28] and [29]. You can just reach one hand down or, to make it harder, you can reach with your opposite arm over your body as shown below. If you do it this way, you can also pull on your leg a bit and get a nice stretch down the side of your body.
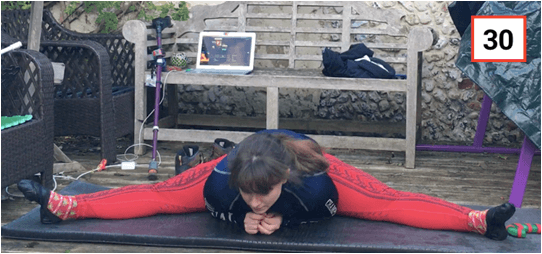
Next we’re going to lean forwards in the straddle to get as low as possible ([30] and [31]). In time, you can have your legs at 180° to each other and sit up for the full splits.
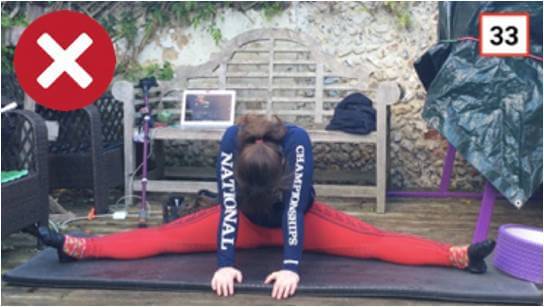
When doing this, it’s important to do it with good form – it doesn’t matter how low you can go if your form is bad! Sometimes I see children trying to reach all the way down and they let their legs splay out behind them so they end up in a sort of commando position. This achieves absolutely nothing! You must maintain the straddle position with your feet in front of your bum – it’s better only to reach a few inches forwards but to hold the right position than to cheat and do it completely wrong.
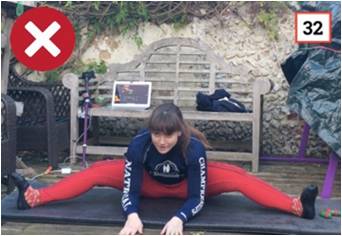
Some more common errors are shown below. In [32], the knees are bent instead of straight.
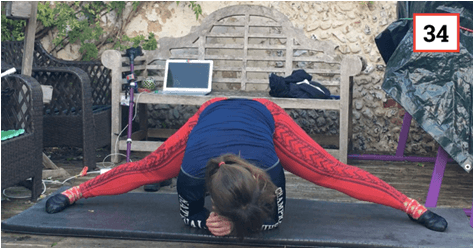
 In [33], the legs are good and the reach is fine but the head and chest are down and tucked in. This targets the wrong muscles and is therefore an unhelpful habit. You should always think about keeping your chest forward and your head up, even when lying down flat in this position!
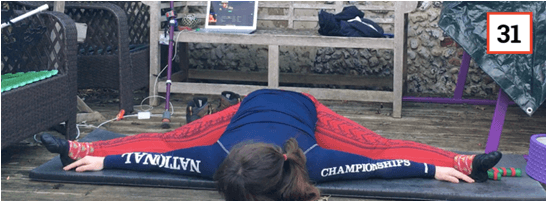
 [34] shows an alternative way of performing these stretches – the shape is essentially the same but the straddle is now in a different plane (an up/down axis rather than forward/back). You can do this from the standing straddle and hands down as shown in [14] and [17] and build up (or, rather, down!) from there. In time, you should be able to sink lower and lower until you are reach the splits and can lift the chest up.
Before moving to forward splits it’s a good idea to give your back and hips a bit of a reshuffle. I tend to repeat the frog [24] and butterfly [26] before continuing.
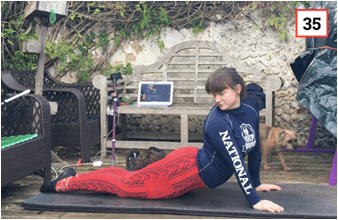
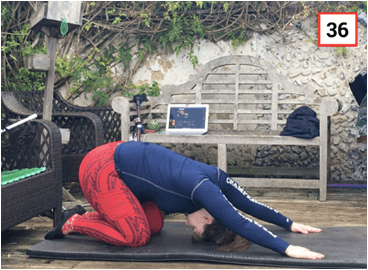
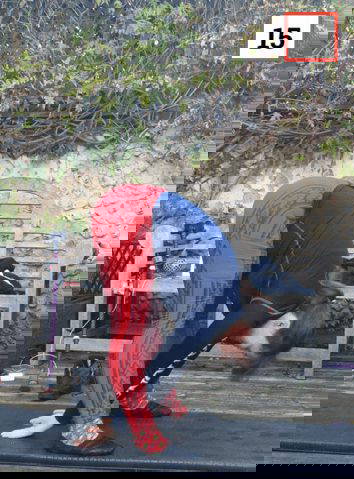
[35] is a variant of [11]. Keep your legs together and turn around to both sides to look at your toes. In [36], sometimes called the cat, you can relax your back and brace your arms to get a stretch down the shoulders too.
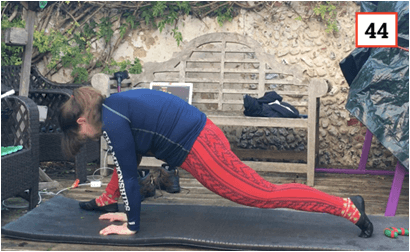
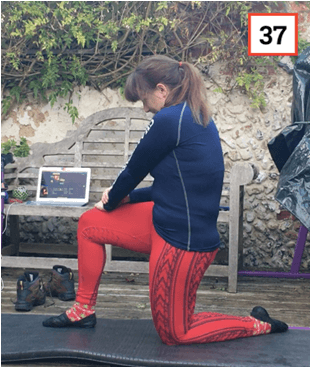 Now we can start working towards front/forward splits. Pick a foot – it doesn’t matter which one because we’ll be doing both! – and pop it out a short distance in front of your other knee. You should aim to make a square (roughly) with three sides formed by your legs and the fourth formed by the ground. In this position, we are aiming to stretch the front of the thigh in the leg that is forward (i.e. with the knee off the ground). Some people find it easier to do this by rounding their shoulders and pressing down on their knee, as in [37].
 This stretch is different to all of the previous ones in that you (probably) won’t feel it simply by adopting the pose – you need to activate the muscle as well in order to feel any benefit. To do this, squeeze your bottom really tight and imagine you’re pushing your hips forward (but without actually letting them move – just feel the tension in the muscle that it produces). It’s hard to describe in words but have a look at [38] for where to squeeze the muscles and to pretend-push from. Have an experiment and hopefully you’ll find what I’m waffling about!
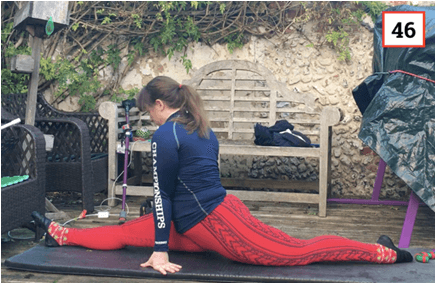
 Next, move your front foot a little further forward, then push your hips forwards and down into the stretch [39]. Keep your front foot flat and your lower leg perpendicular to the ground
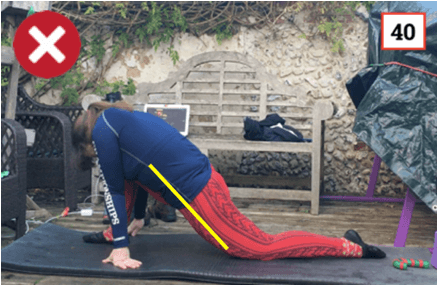
Keep your chest up without collapsing over your front leg [40]. Compare the yellow line in [39] to that in [40] and you’ll see that, if you keep the chest up, you’ll get a better stretch through the front hip flexors of your back leg. Try both and see if you can feel the difference.
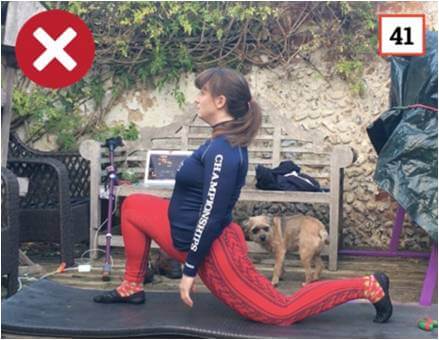
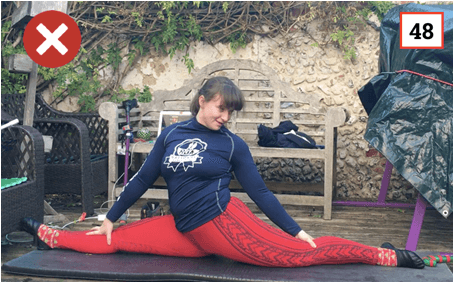
Also, keep your back leg reasonably straight with the top of your foot pressing down into the ground – i.e., not like [41]. Just look at how horrified my dog looks at that terrible back leg!
Next, bend your back leg and straighten your front leg. You can sit down on your foot [43] or stay up a bit taller [42], whichever you find easier. [43] is easier to balance but not comfy for everyone; [42] allows you to lean further and get more of a stretch.
You may well find that just straightening your leg is enough stretch, but if it isn’t then reach towards your toe and, eventually, touch your nose to your knee.
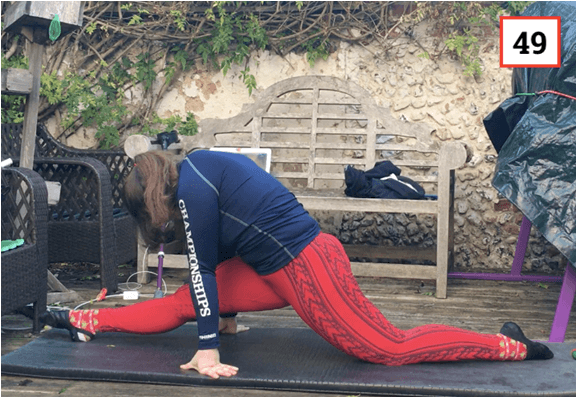
 Bend the front leg and straighten the back leg again, but this time go up on your toes. You can then support your weight on your hands [44] or elbows [45].
When I’m in this position I like to rock backwards and forwards gently from my back foot – it helps me to feel the stretch a bit in my hips/lower back. I have no idea if normal people need to do this but I certainly find it helpful!
 The next stage is the bit where people pull a face – just go for it. Keep one hand either side [46] and go as low as you can. If you can’t go all the way down, it doesn’t matter – practice, and sooner or later you’ll see improvement!
If you can, let go of the ground with your hands. It’s surprisingly tricky to balance in the splits, so practice!
 Try to keep your hips straight. They should be facing forwards with one leg straight in front and the other straight behind. [48] shows the twist that can easily happen. It still looks like the splits from this angle, but it’s a lot easier and therefore wrong! If you think your hips might be twisting, then take the hand that is on the same side as your back leg (so, in this case, my left hand) and place it near your front knee, or even on the far side of your front leg: it’ll help to pull your hips square. Don’t feel discouraged if you then find you can’t go as low as before – that’s normal. Just keep practicing!
 On the basis that most people won’t be able to go straight down straight away, here’s the progression [49]. Keep the front leg straight and allow a bit of bend in the back leg. Make sure that your hips are square (hands level on the ground will help with this) and that your back foot is flat, with the sole of the foot facing upwards.
Now you need to go back and do steps [37] to [49] on the other side!
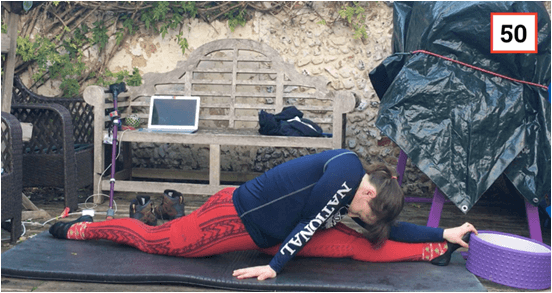 In [50] you can see another way of making the splits a bit easier. Leaning forward – even hugging the front foot – feels a lot easier than sitting up straight. Try it and see! From this position I like to use my spare hand (here, it’s the right one) to push myself from side to side slightly – it just helps me to sink lower. From that position, you can then start to sit up a bit at a time.